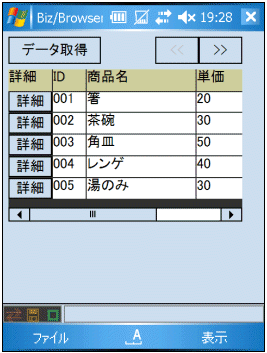
[サンプルコード]

Form Form1{

    Form Form2 {
        X = 5;
        Y = 35;
        Width = 215;
        Height = 140;
        BgColor = $333333;
        Scroll = $AUTO;

        /* タイトル行 */
        Form Form3 {
            X = 0;
            Y = 0;
            Width = 325;
            Height = 21;
            BgColor = $333333;

            Label sp_title[6]{
                Height = 20;
                Layout = $HORIZONTAL;
                LayoutMargin = 1;
                BgColor = $CCCC99;

                this[0].Width = 40;
                this[1].Width = 30;
                    :

                this[0].Value = "詳細";
                this[1].Value = "ID";
                    :
                this[5].Value = "合計";
            }
        }

        /* Formの配列で5行のデータ行を表示します */
        Form Form4[5] {
            X = 0;
            Y = 20;
            Width = 325;
            Height = 20;
            BgColor = $333333;

            Button Button1{
                X = 0;
                Y = 0;
                Width = 40;
                Height = 19;
                Title = "詳細";
            }

            /* Labelの配列でIDから合計までの欄を表示します */
            Label sp_data[5]{
                X = 41;
                Height = 19;
                Layout = $HORIZONTAL;
                LayoutMargin = 1;
                BgColor = $FFFFFF;

                Function OnClicked( e ) {
                    Form2.selectLine( e.from.^.index );
                }

            }
        }
    }
}
機種によって、配列の下から上へ描画されているように見える場合があります。
対応策として、データ行のForml配列オブジェクトのLayoutプロパティを$BLANKに定義し、
配列を下から上へ配置するように方法があります。
 |
例)
var dataHeight = 20; /* 行の高さ */
var dataRow = 5; /* 表示する行の数 */
for( i = 0; i < dataRow; i++ ){
Form2.Form4[i].Y = dataHeight * dataRow - dataHeight * i
+ 1;
} |
詳細なサンプルコードは、
オブジェクト配列を使用した一覧表示(mobSpreadSample.zip)
をご参照ください。
|


 Biz-Collections Bizの宝箱 トップへ
 Biz/Browser Mobile・Biz/Designer Mobile
TIPS集 トップへ